Showing posts with label rice krispy treat. Show all posts

Sunday, July 19, 2015

Chess Jawa - Medium

 My younger son combines his love for Star Wars with his true passion, chess, by cosplaying as the Chess Jawa.  (Look for him in front of the Marriott Starbucks during DragonCon!)  For his birthday, I made a Chess Jawa cake!

This cake is pretty easy if you have worked with rolled fondant.  Here are the instructions.

The day before the party, I baked a cake in the Wilton Stand-up Bear cake pan.  I followed the directions, using a regular pudding-in-the mix yellow cake mix and a pound cake mix, together.  The resulting cake was very nice both taste and texture.  One caveat - the directions say bake in the center oven rack, but the cake was too tall.  Use the lowest rack.  Also, the directions say 2/3 cup batter in the core, but only use 1/2 cup.  Mine baked up to the broiler element! 

If you want to include a chess board, make the chess pieces the night before too.  Because our party was close to July 4, I used red and blue fondant to make the pieces.  (Just shape the chess pieces by hand, as it if were play-doh!)
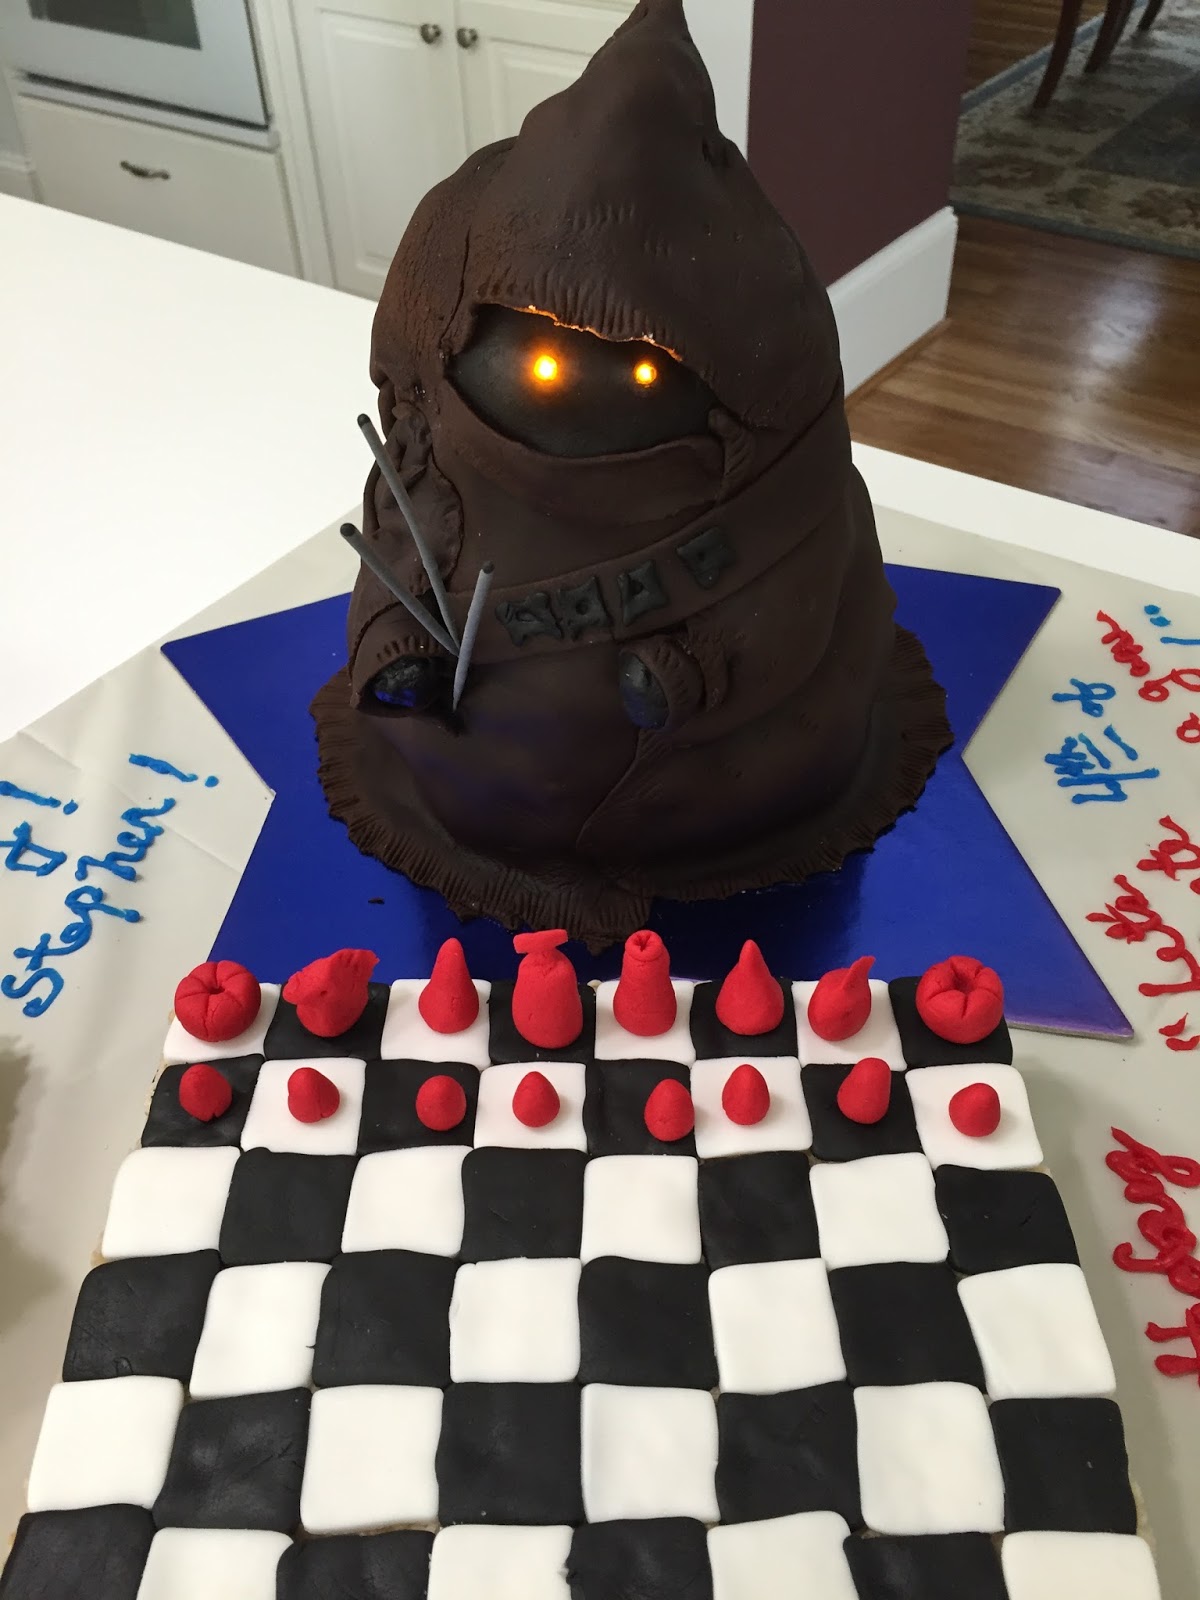
The next morning, I mixed a batch of buttercream icing (see recipe in the side menu), frosted and inserted the cake core, then trimmed the bottom of the cake so that it sat flat on the cake board.   I cut off the bear's ears and feet, then covered the entire cake in a layer of the icing.  Set it aside for an hour or so to really set the icing.  I used this time to make a pan of rice krispy treats for the chess board.

I rolled black and white fondant into sheets and cut out 32 squares of each color, sized to fit my chess pieces.  I turned the rice krispy treat upside down, so that The flat bottom was on top.  Starting with one corner of the rice krispy treat, I layered the chess pieces to make a traditional 64 square board.  I used a large knife to trim the rice krispies from the edges, then cut those into squares for folks to eat. 

Greg prepared 2 small orange LEDs for me, attaching them to button batteries and covering the batterse and wire with tape. The LEDs really make this cake pop!  I rolled a small bit of black fondant into an oval for the face.  Greg pushed the LEDs through the fondant.  The batteries stuck into the fondant on the back side. 

I covered the Jawa with a layer of Satin Ice dark chocolate fondant.  For this cake, use a high quality chocolate fondant - you can order online if you don't have a local source.  I used a little more than 1/2 of a 2 lb. tub.   Knead the fondant quite a bit - you want it smooth, pliant and glossy. 

I rolled about 1 lbs of well-kneaded fondant into a roughly triangular shape.  Using your rolling pin, position the fondant over the cake, so that the top of the triangle is above the head.  The "arms" of the triangle wrap around the cake, to form the robes.  

Greg helped hold the hood part of the fondant open while I got the bottom together.  I smoothed the seam where the edges overlapped and used my fingers to emphasis the arm of the cake bear underneath.   (I made the fondant reflect the shape of the bear.) 

Then, while Greg was holding the hood open, I slid the face (with the LEDs) in place, and arranged the hood piece around.  I tucked a little bit of trimmed rice krispy candy on top of the head to help hold the hood up, then trimmed the fondant on the sides of the hood to remove excess.

The face was a little short, so I rolled a bit of the trimmed chocolate and added this aound the chin.  I also used some of the trimmed bits to create sleeves and the bandolier.  For the arms, I made 2 small balls of rice krispy candy, covered them with black fondant, then inserted them into "sleeves" (really just a ring of chocolate fondant).  I pulled the ends of the rings and used 1/2 a thin bamboo skewer to attach them to the cake. 

I also rolled a long thin strip of chocolate fondant for the bandolier and finished that with little black fondant pockets. 

I finished Jawa by adding some "fraying" texture on the edges of the robes.  If you have a fondant toolset, use the shell tool.  If not, use the tines of a fork.  

Since it was a birthday cake, the Jawa is holding 3 sparkler candles! 


Saturday, July 11, 2015

Separatist's War Council Meeting - Medium

For my oldest son's birthday, we decided to recreate the scene in Ep. 2 where the Separatist Council meets in the war room on Geonosis.  The scene was not all that hard to create, BUT it's big.  Really big.  This is one for a crowd!


First, I rounded up Hasbro figures of all the war council members.  A few extra Geonosians are good.  (I found most of the figures used on eBay and only paid a couple of dollars for them. The figures were a birthday gift for my son too - added to his collection.) 

To get the needed height, we started with Styrofoam rings from the craft store.  We stacked 2 rings then covered with red duct tape.  The Styrofoam also serves as a base upon which we built the walls.   We added dowels to give the walls extra support.  These also held up a wire ring (also from the craft store) that is used for finishing.  Note that we did cut a "door" in the ring.  There is a door way in the scene, and we used that little bit of Styrofoam to hold up the Geonosian in the air.

The walls are my favorite large-scale building material: Rice Krispy Treats.  I made 4 large (10x14") pans of treats - each containing a double batch of mix.  (Use the recipe on the back of the Rice Krispy cereal box.)  Let these set overnight to get completely firm, then run bamboo skewers through them and mount them upright on the Styrofoam base as shown.  Curve them carefully to create the room.   To be safe, I added a backing of heavy paper, and we looped some string around the dowels. 


The war room is covered in a rich reddish tapestry.  I used Froot-by-the-Foot, the red/blue tie dye flavor.  I believe 1 had 12 boxes.  (This comes in boxes with other colors - I used a few of the yellow/orange ones for the wall hangings, but honestly we had a lot left over that we didn't use.  I gave them to kids at the party.)  To make these, cut lengths of the ribbon that fit the height of your walls. Lay them slightly overlapping on a cutting board, then dipping a finger in a bit of water, moisten the edges. Use a rolling pin to press and seal them into a sheet.  Affix the sheet to the walls with toothpicks.  This is hard at first, but you pretty quickly get the hang of it! 


We added some LED lights around the base for fun.  


The holographic war table was the "cake" part of this scene.  My son likes snickerdoodles best of all, so I made 3 giant cookie-cakes using the Wilton 9" cookie cake pan.  (You can use my recipe or else 2 tubes of refrigerated cookie dough.  Sugar cookie and chocolate chip doughs work well.)  The table top was one of the cookies.  I trimmed the other 2 cookies into 6" rounds and used those for the base of the table.  (Use a 6" cake round as a template for trimming.  We just ate the leftover bits.)


The whole cookie cake served as the table top.  I turned it upside down, so the flat surface was on the top and placed an 8" cake round under the it so it could sit on top of the stacked 6" cookie bases.  You can see it here, after I pulled it off the base to serve.  
 

With the 9" cookie upside down on the base, I rolled white fondant and cut a circle using the cookie plan as a template.  I let this harden for a couple of minutes, then placed it on top of the cookie.  I then rolled red fondant and cut a 6" circle to go on top, as pictured.  I added the holographic details by gently warming and trimming gummy bears.  The large elements are 3 Swedish Fish, warmed and smushed together, with a toothpick to hold them up.  I had some pearl luster dust that I rubbed around the white edge to give it some shimmer. 


I finished the scene by positioning the Hasbro figures.  I hot glued one of the Geonosians to a clear plastic floral pick so he could fly over the scene.  The pick is inserted into a pit of leftover Styrofoam that we taped to the bottom of the scene to support him. 


Lastly, I covered the back of the scene with a bit of red fabric that I had left over.  It gave the war room a finished look from behind! 

Monday, November 11, 2013

Star Wars Mos Eisley Cantina (Medium)

We decided to recreate Chalmun's Cantina.  This project was fairly easy in terms of the skill required, but challenging due to the scale.  We wanted the Cantina to be appropriately sized for Hasbro figures.  So it's big!

I started by rounding up all of the Hasbro characters that I could find - the boys had some, I found some on eBay, and borrowed the rest. Some of the Hallmark Christmas ornaments also work - I have the Celebration set with Obi-Wan, Ponda Baba, and Baba's severed arm... (how perfect is that!)

I found good floor plan diagrams of the cantina online, and removed most of the interior walls.  I did have "niches" for the band, and (of course) Han and Greedo.  Keeping the curved wall with the dome was also important.  I planned where I would put the figures I had, based on the scene from the movie.

I laid out the floor plan 2 days before the party.   I started with a 33"x33" cake board.  We covered it with a piece of tan plastic tablecloth, then created a foundation for the walls using a 2" strip of stryofoam covered with tan masking tape.   (This added height and also provided a place for skewers to stabilize the walls.) 

I knew I needed approx. 7" for the band, so I scaled the rest from there.  The entire structure is approx. 32"x32", with the bar set 11" in from each side.  (the center of the bar is in the middle of the back part of the structure.  The bar is approx 14" long.  The bar top is 2" deep, with 2" between the bar top and the center island.  The island is also 2" in deep.  This scale worked well with the figures. 

The day before the party, I made rice crispy treats for the walls.  At some point I lost count, but I think I made 9 pans (9x13) - yes 9 - of rice crispy treats.  One batch made the dome.  (Molded that in half of the ever-so-useful Wilton sports ball pan!)  The rest were simply cut into 2" strips and piled on the foundation.  My target wall height was 6", with the dome on top.  The rice crispy strips curved very easily to make the rounded wall.  Be sure to spray the pans liberally with non-stick spray!  For planning, I started around 3 pm and finished around 7:30 or so.

Notice the "gap" in the wall - that's where a snickerdoodle wall gets inserted.


When I was done with the rice crispy treats, I made the dough for the snickerdoodles.  I made a double-batch of dough (see recipes side link) - this was more than I needed, but I wanted to freeze some dough for Christmas baking next month.  I "rolled" the dough into square-shaped logs that we 2" thick, so that I could slice-and-bake the bar structure the next morning.

The morning of the party, I got up early and baked cookies.  I sliced cookies to stack as the bar and for the final bit of wall (the wall behind the bar).  Before I baked the cookies, I used a Wilton large round tip (#12) to cut a hole in the center of each cookie.  This enabled me to stack them on bamboo skewers which I stuck in the foam.  It turned out that I didn't need skewers for bar itself, as it was only 3 cookies tall, but I did use skewers for the exterior wall.  Bake some cookies without holes for the top.  I rolled some additional dough out for the walls, table tops and bar tops.

Once it was all together, I added the Hasbro figures.  I finished up by using some fondant to make the vessels on the bar island and the cups for the figures.  (For the cups, just shape a small tube, then use a skewer to make the hole.) 


Before we served this, we dropped a little MP3 player and tiny speaker in the area under the dome, playing the Cantina band music clip!  I also added a tiny cup with a bit of dry ice and hot water behind the bar to give a smoky effect.  Very fun! 

Here are some shots of the interior:


To serve, just cut apart the walls!  Enjoy!

Thursday, August 25, 2011

Cylon Cake - Difficult

 The cake actually isn't too hard, if you have a Larson Scanner...


This cake consists of 4 8" round layers, stacked with buttercream between each layer.  The top 2 layers are on a cake round, with dowels below for support and stability.

I molded Rice Crispy Treats to make the crest and face plate.  I cut a "window" for the Larson Scanner display.

Greg assembled the Larson Scanner from a kit (EvilMadScientist.com:  http://evilmadscience.com/productsmenu/tinykitlist/152-scanner?qh=YToxOntpOjA7czo2OiJsYXJzb24iO30%3D)   He used a fairly long wire for the battery pack, so the wire could wrap around the cake to the battery pack on the back of the cake board.

Greg also built a little shelf for the scanner from a thin piece of wood and encased it in a box made from a clear (grayish) plastic notebook divider page.  I placed bamboo skewers between cake round (under the 3rd layer) and the cake layer, so they protruded to make a little shelf.   I mounted the Larson Scanner on this shelf, placing the battery pack on cake board in the back.

I placed the rice crispy treat face place over the front and top of the caked, using liberal amount of buttercream to hold it in place. 

I covered the whole thing in gray-tinted rolled fondant, with the wire emerging from the back of the cake at the very bottom.  I covered the scanner with paper and sprayed the cake with edible silver spray color, to give it a shiny metallic look.   Remove the paper, turn on the power, and voila!

Sunday, August 21, 2011

Rebel Alliance Rice Crispy Treat


Spray round cookie pan with non-stick spray.  (I use a round 9x13 Wilton cookie pan.)  Prepare batch of Rice Crispy Treats as directed on cereal box and allow to cool in the cookie pan to set. When firm, unmold onto tray or serving platter. 

Copy and enlarge the logo below so that it fits your cookie pan.   Print.  


Cut strips of strawberry Froot by the Foot (or similar product) and overlay them on the logo.  Trim so that only the logo is covered.  (Tip: trim with a  sharp paring knife or a pizza cutter.)   

Using a small roller or a glass, gently roll the Froot strips so that the edges stick together.  They will not adhere perfectly, but they will stick - if you have trouble rub the edge with a damp finger.)   Move the paper with the logo to your treat, and gently slide the Froot logo off onto the treat.  Smooth the logo onto the treat.