Showing posts with label star wars cake. Show all posts

Sunday, July 19, 2015

Chess Jawa - Medium

 My younger son combines his love for Star Wars with his true passion, chess, by cosplaying as the Chess Jawa.  (Look for him in front of the Marriott Starbucks during DragonCon!)  For his birthday, I made a Chess Jawa cake!

This cake is pretty easy if you have worked with rolled fondant.  Here are the instructions.

The day before the party, I baked a cake in the Wilton Stand-up Bear cake pan.  I followed the directions, using a regular pudding-in-the mix yellow cake mix and a pound cake mix, together.  The resulting cake was very nice both taste and texture.  One caveat - the directions say bake in the center oven rack, but the cake was too tall.  Use the lowest rack.  Also, the directions say 2/3 cup batter in the core, but only use 1/2 cup.  Mine baked up to the broiler element! 

If you want to include a chess board, make the chess pieces the night before too.  Because our party was close to July 4, I used red and blue fondant to make the pieces.  (Just shape the chess pieces by hand, as it if were play-doh!)
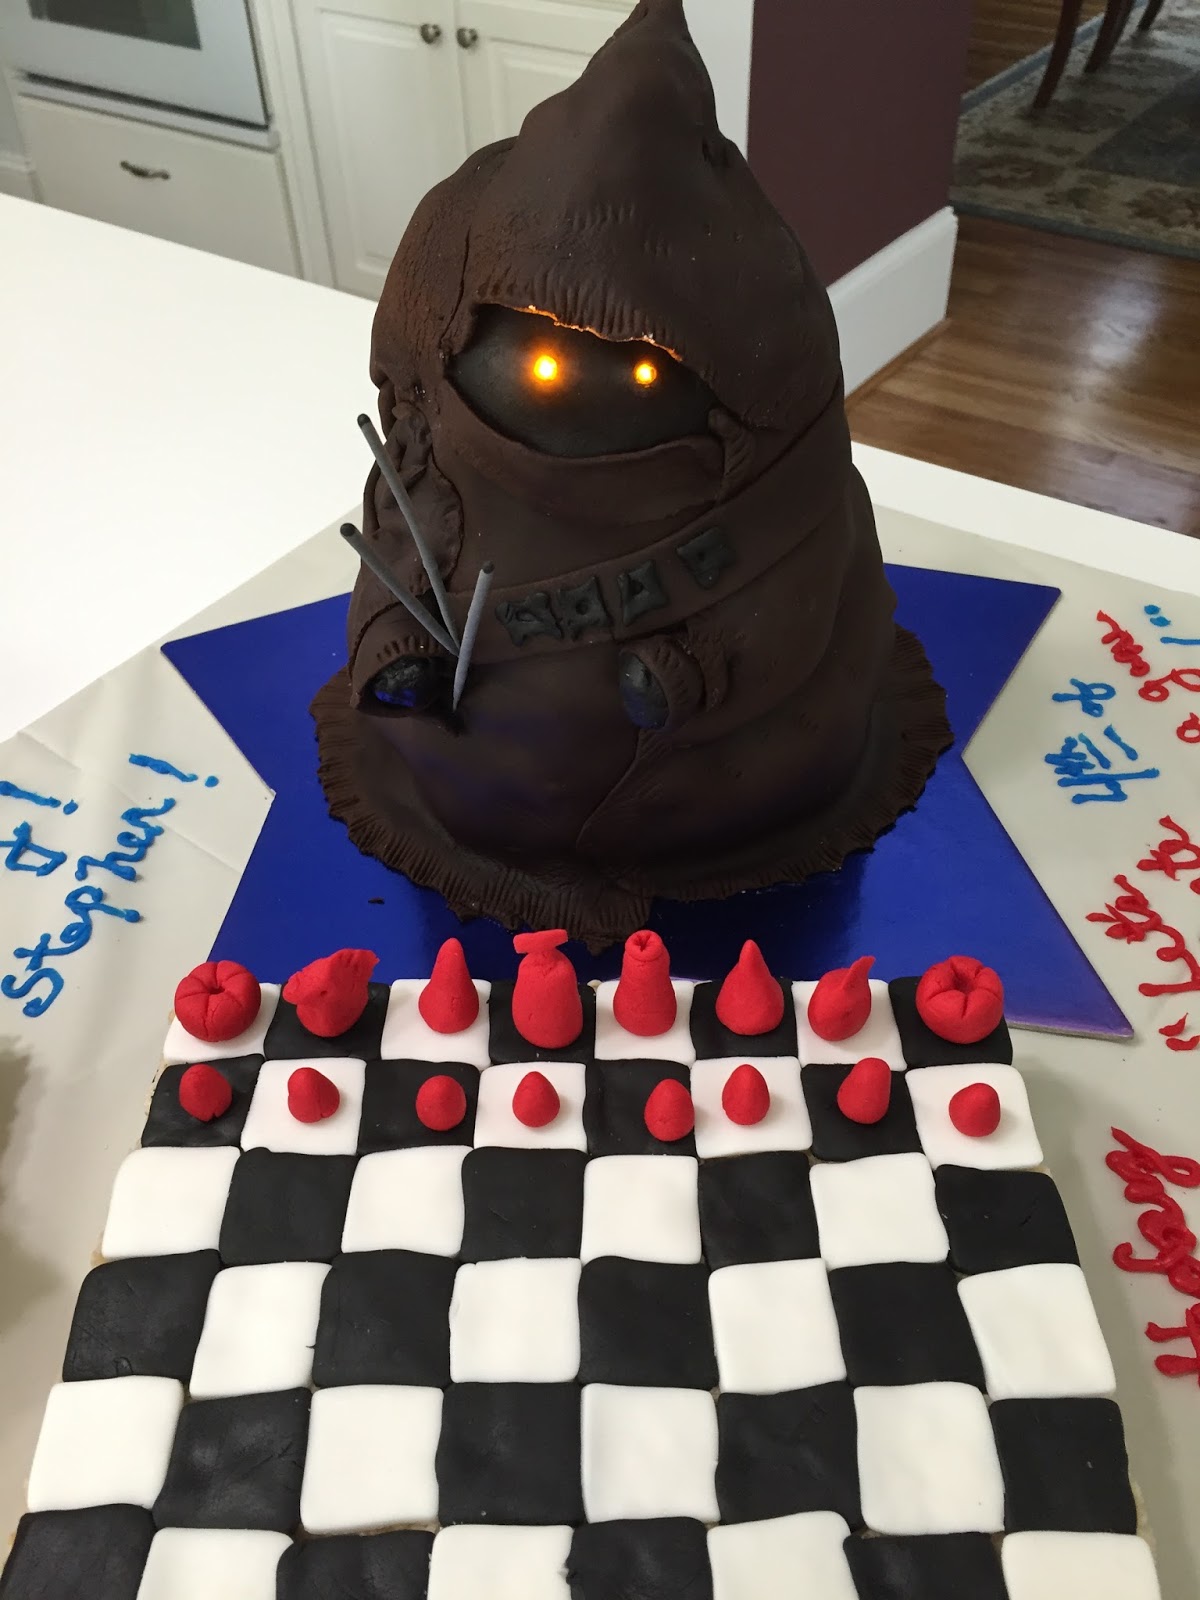
The next morning, I mixed a batch of buttercream icing (see recipe in the side menu), frosted and inserted the cake core, then trimmed the bottom of the cake so that it sat flat on the cake board.   I cut off the bear's ears and feet, then covered the entire cake in a layer of the icing.  Set it aside for an hour or so to really set the icing.  I used this time to make a pan of rice krispy treats for the chess board.

I rolled black and white fondant into sheets and cut out 32 squares of each color, sized to fit my chess pieces.  I turned the rice krispy treat upside down, so that The flat bottom was on top.  Starting with one corner of the rice krispy treat, I layered the chess pieces to make a traditional 64 square board.  I used a large knife to trim the rice krispies from the edges, then cut those into squares for folks to eat. 

Greg prepared 2 small orange LEDs for me, attaching them to button batteries and covering the batterse and wire with tape. The LEDs really make this cake pop!  I rolled a small bit of black fondant into an oval for the face.  Greg pushed the LEDs through the fondant.  The batteries stuck into the fondant on the back side. 

I covered the Jawa with a layer of Satin Ice dark chocolate fondant.  For this cake, use a high quality chocolate fondant - you can order online if you don't have a local source.  I used a little more than 1/2 of a 2 lb. tub.   Knead the fondant quite a bit - you want it smooth, pliant and glossy. 

I rolled about 1 lbs of well-kneaded fondant into a roughly triangular shape.  Using your rolling pin, position the fondant over the cake, so that the top of the triangle is above the head.  The "arms" of the triangle wrap around the cake, to form the robes.  

Greg helped hold the hood part of the fondant open while I got the bottom together.  I smoothed the seam where the edges overlapped and used my fingers to emphasis the arm of the cake bear underneath.   (I made the fondant reflect the shape of the bear.) 

Then, while Greg was holding the hood open, I slid the face (with the LEDs) in place, and arranged the hood piece around.  I tucked a little bit of trimmed rice krispy candy on top of the head to help hold the hood up, then trimmed the fondant on the sides of the hood to remove excess.

The face was a little short, so I rolled a bit of the trimmed chocolate and added this aound the chin.  I also used some of the trimmed bits to create sleeves and the bandolier.  For the arms, I made 2 small balls of rice krispy candy, covered them with black fondant, then inserted them into "sleeves" (really just a ring of chocolate fondant).  I pulled the ends of the rings and used 1/2 a thin bamboo skewer to attach them to the cake. 

I also rolled a long thin strip of chocolate fondant for the bandolier and finished that with little black fondant pockets. 

I finished Jawa by adding some "fraying" texture on the edges of the robes.  If you have a fondant toolset, use the shell tool.  If not, use the tines of a fork.  

Since it was a birthday cake, the Jawa is holding 3 sparkler candles! 


Saturday, December 17, 2011

Peace on Endor - Medium

I made this cake for my Star Wars friends for our annual Life Day Party:  Peace on Endor!  Good Will to All Beings!


I made the fondant figures in advance:  Jawas untangling a box of Christmas lights, a Wookie and Ewok family decorating a tree with imperial helmets...


The wookie looked like he might have been in the eggnog.  (Plus he was a little tipsy on the cake!)
Secure the standing figures to the cake with skewers or toothpicks.  (The baby ewok is just sitting on the cake, with her candy cane, as is the kneeling jawa.  The standing jawa is built on a part of a sugar cone, so very stable.  I used orange nonpareils for the eyes.)

I baked a 14" round cake plus the small paisley cake.  I used 3 box mixes across the 2 pans.  Let cool and cover with white buttercream.

To make the tree, cover a plain sugar cone with green stars (using #16 Wilton tip and a tube of green icing) - pull the stars a bit as you release, to make "branches."  Decorate with small lights from a craft store, candies, and helmets.  Affix Lego helmets with a bit of green icing.  

On the top layer, we had Darth "I find your lack of Festivus disturbing" Vader with a Festivus pole. 


Just because.  Happy Holidays!  (And may the Force be with you, throughout the year!)

Sunday, August 21, 2011

Death Star - Medium to Difficult

The Death Star cake is really 2 separate cakes.  The Death Star itself, plus a plain sheet cake (using the Wilton large paisley pan) upon which X-wings and TIE fighters wage a battle.  The Death Star looked great, but before we could photograph it, the board got bumped and the ball rolled off the stand and hit the floor.  Minutes before the party!  I touched it up, but you can see the damage.  C'est la vie.


In advance, make x-wing and TIE fighters out of fondant. I snagged some clear plastic skewers from the floral dept at my grocery store, and let the figures set in a block of Styrofoam.  (These are the skewers that hold little cards in a bouquet of flowers or a plant, just break off the prongs at the top.)  The TIE fighter wings are held on with toothpicks.  Break off bits of toothpick to get the right size.   

1.  Make a round cake using the Wilton Sports Ball pan.   Using 2 box mixes (same brand/flavor) make the large sheet cake using the Wilton Paisley pan.

2.  For the Death Star - frost smooth with gray buttercream.  Add rolled fondant panels on the sides, leaving a space open for the weapons crater.  When the icing is dry, depress the crater using a ping-pong size ball.  I used the ball from my track-ball style mouse.)  Use a Wilton No. 2 tip to add lines/detail to the crater.

Note:  I covered a tall plastic drinking glass with black fondant to serve as the stand for the Death Star.  I placed the Death Star on the stand, but did not "glue" it down with buttercream.  20-20 hindsight puts a big dollop of icing on that glass before I set the ball on it!

3.  For the other cake, to make as pictured, cover the cake with high-quality rolled fondant, tinted dark gray.  See my page on Rolled Fondant.  Alternative, frost smooth with dark gray buttercream.  Position the vehicles as shown (or as you like).  Finish with a row of small fondant balls (or buttercream open stars) around the base.


Holidays On Hoth - Difficult

I made this cake for a Life Day party.  I'm not sure I can provide good instructions, as there were lots of details, but you can look at the pictures for ideas.  Overall it's not really a difficult cake if you have mastered fondant figures.  It did take a fair bit of time! 


1.  In advance, make fondant figures:  wampas and taun tauns, as needed for the scenes on your cake.  I also made the packages snowman and other decorations (candy cane, red part of the Santa hat, ice cave roof) - everything except the Christmas tree.  See my page on Working with Fondant.  You have to made the ice cave roof in advance, so it dries very hard - otherwise it would sag in the middle.  To make the wampas furry, I scored the fondant with fork.

2.  I made the base cake in the Wilton large paisley pan.   I also made 2 cakes using the small paisley pan.  I made one other cake, using a cathedral-style Bundt pan.

3.  I stacked the 2 small paisley cakes on the large cake, then added a section of the cathedral cake.  I frosted everything with Buttercream, using open stars to create texture on the cathedral section.

4.  I covered the open space between the top of the cathedral section and the paisley top with a thin peice rolled white fondant that I had rolled in advance for the ice cave roof..   I used buttercream open stars to attach this to the cake.  This created the ice cave.  I dusted the top with a bit of powered sugar to make it look snowy.


5. Once the icing holding the ice cave roof was set, I very carefully affixed a Lego mini-figure Luke to the roof with buttercream icing.   I positioned Luke's Lego light saber on the floor of the cave.  (Be sure to snag the Legos before you eat the cake, esp the light saber!)   I also added some iciles to the front of the roof, using a  Wilton No. 2 tip.

6.  I covered a green sugar-style ice cream cone with open stars (using a No. 16 Wilton tip).  I used a tube of kelly green icing.  Pull the stars a bit before you stop squeezing the tube to make "branches" on the tree.  I decorated the tree with a fondant star (cut using a little star cookie cutter) and with candy beads.  Apply the beads with tweezers.   

7.  Once the icing on the tree was set, I carefully positioned it on the very top of the cake, and positioned the taun tauns around it.  I added some small open stars with gray icing to make the taun taun fur. The lights were a decoration off a Christmas card and are not edible - you can find similar lights for crafts in your local craft store at the holidays.

8.  I positioned the wampas in the front, so they looked like they were awaiting the arrival of a friend.  I attached the Santa hat using white icing and a very small open start tip. (Wilton No. 13 or 14)  The arriving wampa's gift is also from the craft store.

9.  I positioned the remaining 2 taun tauns on the back, with the snowman and some little white fondant snowballs.  I piped the menorah on the back using tube icing and a Wilton No. 2 tip.  I used a No. 1 tip to make the candle flames.

10.  I finished the cake with a row of open stars along the base. 

 Wampa arriving for the gift exchange. Gift is not edible - from craft store.

  Taun tauns decorating a Christmas tree.  And having a snowball fight below.


You can see Luke in the ice cave.


R2-D2 - Difficult


Have a good picture handy to help with decorating.

1. Bake 8 round layers (8” is best, 9” okay). 

2.  Level each layer.  See: http://www.wilton.com/cakes/making-cakes/leveling-cakes.cfm  Do not skip this step!  Otherwise your cake will not be straight or stable! 

3. Using cake circles, create 4 2-layer cakes with buttercream icing between each layer.  Crumb coat with icing.

4.  Stack 3 of the cakes (to make a 6 layer cake) using dowels to separate each cake.  See: http://www.make-fabulous-cakes.com/tiered-cakes.html  Do not skip the dowels!  Your cake cannot stand without dowels!

 5.  To make cake pictured, cover with while rolled fondant. See: http://www.wilton.com/decorating/fondant/rolled-fondant.cfm  This is pretty tricky to do on such a tall cake, so it may take some practice.  Be sure the icing is dry before you lay the fondant on it.  Use a high quality fondant, such as Satin Ice - see my Rolled Fondant post for details.  Alternative 1: cover the 2 layer cakes with fondant, and just cover the "seam" with decorations.  Alternative 2:  frost smooth with white icing.

6.  Put the last cake on a thick silver cake drum.  Using a serrated knife, cut the dome shape.  Alternative, you can bake the last layer in a Pyrex bowl.  Frost with gray buttercream, and/or cover with gray rolled fondant.

7.  Tint fondant blue and gray.  Cut shapes from fondant for details (use sharp paring knife, cookie cutters).  Attach to cake by brushing very lightly with water.  (small brush or damp finger)

8. The red “eye” is the ball from my “track ball” style mouse. It really looked good – see if you have something handy to use for this!  Or else use a fondant sphere, rub with vegetable oil to make the ball shiny.

9. Decorate base with balls of fondant.

10. Create arms out of Styrofoam or Rice Crispy treats, cover with fondant, decorate and position.

Note – this cake is pictured on a stand using for decorating from Joann’s or Michael’s – it made a perfect base for R2!